Wednesday, December 16, 2009

Gingerbread Pancakes

A friend dragged me to I-hop a couple of weeks ago for breakfast and I had the gingerbread pancakes they are featuring for the holidays. They were amazing! I don't usually use this term when discribing food from I-hop. I have been craving them since so I decided to try to make them myself. I scoured the internet looking for recipes -I was suprised to find there were so many! I finally decided to take a little from all of the recipes I had seen. They came out really good as I am not a fan of pancakes typically. Next time I will add a bit more of the spices. The pancakes were a nice light brown color but I was hoping for something darker. Maybe I will add a little cocoa powder next time for coloring.


Ingredients:

-2 and 1/2 cups all-purpose flour
-1 cup dark brown sugar (come to think of it I used brown sugar not dark brown sugar - is there a difference?)
-1 tablespoon baking powder
-1 and 1/2 teaspoons baking soda
-1 teaspoon salt
-2 teaspoons ground cinnamon
-1 and 1/2 teaspoon ground ginger
-1/2 teaspoon ground nutmeg
-1/8 teaspoon ground cloves
-1/2 cup water
-1/2 cup brewed coffee
-4 eggs
-1 stick (1/2 cup) unsalted butter, melted (I used margarine)
-1/4 cup lemon juice


Mix the first 9 ingredients (all the dry stuff) together in one bowl and mix all the wet stuff: water, coffee, eggs, butter and lemon juice in another large bowl.


When ingredients in both bowls are combined add the dry ingredients to the large wet ingredient bowl. Mix everything together until smooth and let stand for 15 minutes. Heat griddle or skillet on high heat and brush with oil.


When 15 minutes are up take a 1/4 cup measure and scoop pancake mixture onto griddle. I could fit 4 in my skillet at a time. Wait until pancake is bubbling on top and browned at the edges to flip over. Once on side is cooked the second side cooks pretty quickly. Brush skillet with oil inbetween batches. Sprinkle with powdered sugar and cinnamon when ready to serve.


Pancakes starting to bubble slightly.


First four pancakes!

The finished product covered in sugar and cinnamon!

Sufganiyot for Hanukkah - Jelly Filled Donuts

I am not a fan of jelly donuts but it is a tradition to eat them on Hanukkah. Anything fried is really traditional for hanukkah but sufganiyot has become a staple - especially in Israel. Typically my mom just picks them up from Dunkin Donuts, I eat a bite and thats it. This year I decided to try to make them ourselves and she loved the idea. I loved these dark cherry filled donuts that we made and I couldn't stop eating them! They are pretty small, only a few inches and oh so cute! I found this Israeli recipe online posted by Ciaran from Momfluential:

Step one: dissolve 2 tablespoons of yeast and one teaspoon of sugar in a half cup of warm water. After 15 minutes it gets nice and bubbly. While the yeast is working its magic begin step 2: place 2.5 cups of flour and 2 tsp salt in a large bowl and sprinkle with a little bit of allspice.

Step 3: When the 15 minutes has pst and the yeast and sugar mixture is bubbly make a well in the center of the flour mixture. Pour in the yeast mixture, two tablespoons of room temp butter, 1/3 c sugar, and 2 large eggs.

Step 4: Mix everything together well and knead dough until it is smooth and bounces back when touched. This should take 10-15 mintues. Dough will be super sticky so make sure your hands are well floured to knead the dough.

Step 5: Let stand to rise for 2 and a half hours in a warm place (my mistake was putting it in the fridge - didnt really rise!)

Step 6: When the two and a half hours are up roll dough out on a well floured surface and cut with a round cookie cutter or in my case (I dont do a lot of baking) with round glass. Once circles are cut cover with plastic wrap and leave to rise for 15 more minutes.

Step 7: While donut circles are rising heat several inches of vegetable oil in a skillet - it hanukkah - these donuts are deep fried! Make sure to test the oil with a small strip of dough before putting dough circles in oil.

Step 8: Once the 15 minutes are up and oil is hot enough begin to add dough to hot oil in batches of 4-5. Use a slotted spoon to flip over or roll over donuts once bottom side is browned. When donuts are browned on both sides remove from oil and place on a plate or baking sheet. Continue like this until all donuts are cooked.

Step 9: Pick a jelly to fill your dougnuts with - strawberry is common or cherry. We used black cherry jelly. Cut a small slit into one side of the donut and use a baby spoon to insert some jelly into the donut.

Step 10: sprinkle with fine sugar and enjoy!!


Completed donuts waited to be consumed the next day for Hanukkah! We made these a day early but of course we had to "sample" some to make sure they were fit for consumption. I must say they were a lot better all nice and warm when they were first made. I would recommend making them the day you want to eat them. They dont store well - after about 2 days they were pretty stale.


My mother filling them with jelly - mmm!
Happy Hanukkah!

Thanksgiving Feast

A few weeks ago was Thanksgiving 2009. This was the most amazing Thanksgiving in years....most thanksgivings something terrible happens: the family cat gets deathly sick and needs to have an operation on thanksgiving, I break a bone and end up in the emergency room (this happened serveral times), I'm in the middle of moving and dont have the energy for Thanksgiving.

This Thanksgiving my mother, several of her friends and I went over a cousin's house. It was amazing, no one hurt themselves, no animals died (well maybe the turkey and pig that we ate - but no pets) and I didn't have to do any work! Everything was great - here is shot of dinner:


We had everything - green beans, sweet potato, ham, turkey, creamed corn casserole, stuffing, and stuffed mushrooms!


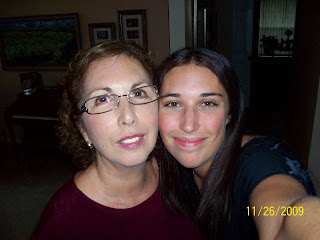
Me and my mom - we don't have enough pictures together.

Wednesday, December 2, 2009

Boursin and Cherry Stuffed Chicken Breast


So I moved this past weekend and before I moved I had some things in my fridge/pantry that I wanted to use up. I decided to combine a few things and make a stuffed chicken breast.


I had some herbed spreadable cheese - Boursin, boneless chicken breast, some dried cherries and some mamasita fiesta sauce.


I cut the chicken breast in half to make two cutlets and spread some cheese on each cutlet and dotted with the dried cherries. I rolled up the chicken and secured with toothpicks, placed them in a casserole dish and heated them in the oven at 400 degrees until the chicken was golden brown and the cheese was bubbly.


I served with a side of stuffing and green bean casserole. I ate the first piece of chicken with nothing on it and it tasted really good. I decided that I would try heating up a little mamasita's fiesta sauce and water in a saucepan and pouring it over the second piece. It was so good I decided to make the same exact meal for my mom a few days later.


This is a meal that was so easy to make and the combination of herbs and sweet cherries tasted so good I would make it again and again!


Eggplant and Ziti Casserole

At work we get all types of free samples of produce for various reasons. Last month I got a few eggplants and had to think of some creative ways to use them. I also had some non-fat ricotta cheese that I needed to use up. I decided to try to make a casserole. I had seen something similar on a recipe website a few months before. I love casseroles! Not alot of work or clean up, plenty of leftovers and the food is so hearty!


I cut the eggplant up into long slices about 1/4 inch wide and fryed until brown on both sides. I lined the bottom of a casserole dish with the eggplant and set aside.


I used Ronzoni smart taste penne rigati- its suppose to have vitamins and be healthier for you. I used 3/4 of the box of penne - boiled some water and cooked the pasta until tender.


While the pasta was cooking I mixed the carton of non-fat ricotta cheese with a little parmesan cheese, cracked black pepper, italian seasoning, a little crushed red pepper and garlic salt.


When the penne was done cooking I drained and mixed with the ricotta cheese mixture. Layered half of the penne/cheese mixture over the eggplant and then add a layer of red sauce and the rest of the penne/cheese over that. Bake at 400 degrees until the cheese and noodles on top turn golden brown.

What I got looked like this:


It was sooo good and pretty healthy too!

Tuesday, December 1, 2009

Baby Butternut Squash Risotto

We got some baby butternut squash in at work last month and I couldn't figure out what to do with it - then it came to me - risotto! I have cooked butternut squash or risotto myself before so it was alot of fun.


The first thing I got to was cooking the butternut squash - I decided to split them in half and scoop out the huge amount of seeds inside. Then I filled each half with butter and sprinkled with sea salt and cracked black pepper. I put them in the oven at 400 degrees until all the butter was melted.


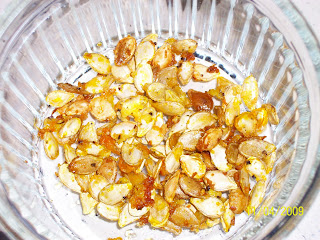
The most fun for me was all the seeds which I wasn't really expecting! I baked them with the butternut squash. I sprinkled them with garlic salt, cracked black pepper, olive oil and parmesan cheese...mmm!

Before it went in the oven it looked something like this:

And after it came out of the oven:


While the butternut was cooking I got started on the risotto. Being the first time I cooked risotto I went with a basic recipe.

You need the following ingredients:

1 cup white arborio rice

1 tablespoon Olive oil

1 large yellow onion diced

1/4 cup grated Parmesan cheese

5 cups hot chicken stock

1/2 cup white wine

Start with heating oil in a pan on medium and sauté the diced onions until translucent. Add dry arborio rice and stir...continue stirring until a white dot shows in the middle of the rice. Add white wine and stir until absorbed. Then add 1/2 of the stock and stir constantly until the stock is absorbed. Once stock is absorbed add more stock 1 ladel at a time and stir until absorbed, continue doing this until all stock is gone. This should take about 20 minutes and the rice should have a creamy consistancy when you are done. When the last of the stock is absorbed remove from heat and stir in parmesan cheese. Season with salt and pepper.

I couldn't believe that this:


Ended up looking like this:


I made a huge mess and it is very time consuming but it was so good!


By the time the risotto was finished the butternut squash hadn't really had a chance to cool down yet so I scooped it out with an ice cream scoop and mixed it into the risotto.


The end product looked something like this:


But really my favorite out of all of it was really the pumpkin seeds, finally made it feel like fall was here: