Showing posts with label dinner. Show all posts

Tuesday, January 7, 2014

Chicken Quesadilla Dip

One of my favorite and not so healthy meals is chicken quesadillas.  For some reason I have never posted the recipe online.  I recently decided to make just the filling of the quesadillas as a dip for New Years Eve and it came out great!  No leftovers unfortunately though :(


Ingredients:
-1 can of salsa (I use medium usually)
-1 bag of shredded Mexican cheese
-1 pound shredded cooked chicken (white meat)
-1 to 2 teaspoons chili powder depending on taste
-2 to 3 teaspoons fresh chopped cilantro depending on taste
-1/2 cup mayo

The mayo in this recipe really tones down the spiciness of the dish so if you like your food a little spicy don't be too nervous that you will add too much.  On the other hand, if you feel you added too much chili powder you can add more mayo to tone the flavor down.

Preheat over to 400 degrees.  Combine all ingredients in a bowl and spoon into an over safe casserole dish when combined.  Bake at 400 for approximately 10 minutes or until dip is bubbly.  Serve with tortilla chips.

If you would like quesadillas instead of dip - spoon this mixture into soft tortillas that have been buttered on the outside.  Arrange in a casserole dish and bake for 10 minutes at 400 degrees or until tortillas begin to brown. 

Tuesday, November 19, 2013

Cholent

Seeing as how its almost next Hanukkah, I thought I would post my recipe for cholent that I made for friends last Hanukkah.  Cholent is a Jewish stew that is very hearty and is typically made on Shabbos as it can stew in a slow cooker before Shabbos and ready to eat the next day.  I have had this meal at orthodox Jewish homes and I am a huge fan.  There are quite a few ingredients but its fairly simple to make and the result is a very filling, warming meal - perfect for cold nights.  My favorite is the beef in this dish, it is so tender!

I'm going to include my pictures but they don't do this food justice...I was too excited to eat it to worry about taking pictures!


Ingredients:
- 1 large white potato (I used a sweet potato though) chopped
- 2 yellow onions chopped
- 2 lbs of flank steak sliced to fit into the slow cooker
- 1 teaspoon black pepper
- 1 cup barley
- 1 cup red kidney beans (dry)
- 3 teaspoons of chicken or beef stock
- 2 tablespoons of paprika
- 2 tablespoons of honey
- 1 loaf of kishka (you can find these in kosher/jewish markets and even my local publix sells them in the frozen food aisle)
- salt to taste

Directions:
- after chopping onions and potatoes put these inside of the slow cooker/line the bottom of the slow cooker with them
- add barley and kidney beans on top of onions and potatoes
- sprinkle with stock, paprika, honey and salt if you choose to add
- place kishka in the middle of the slow cooker on top of all of the ingredients
- chop flank meat to fit in the slower cooker (large chunks or strips) and sprinkle with ground pepper before putting meat into slow cooker.  Place meat around kishka.
-add water to cover beans and barley (approximately 2-3 cups of water)
- cover and turn slow cooker on low
-cook on low for 5-8 hours

This is what it will look like before you add water:
 
After adding water and covering:
 
After its been cooking for some time:
 
The finished product:
 
So it doesn't look so great but it tastes amazing! Everyone loved it and even the canine partygoers were begging for more:


If I had thought about it sooner I would have done something again this year, the holiday just feels so weird this year being so close to Thanksgiving instead of Christmas!  Below are some pictures of the table...my mom made latkes and my roommate made Israeli salad as well...and some pictures of the lighting of the candles and playing dreidel:


HOPE EVERYONE HAS A HAPPY HANUKKAH THIS YEAR!!!


Monday, October 28, 2013

Clams with Sake

I had a housewarming several years ago and I had an Asian theme so everyone, and I mean everyone, brought me a bottle of sake. I am not actually a huge sake drinker (I prefer soju) so it's taken me a while to use these bottles up. I cook with wine often so I decided to cook with sake and I absolutely love it. I chose to steam clams with sake and the end result has a great flavor- it's even a bit sweet. The first time since I didn't know quite what I was doing a used frozen clams. Here are the ingredients:

-package of frozen clams
-sake (enough to fill bottom of pan and cover at least half of the clams)
-onions
-chopped scallions and togarashi spice for seasoning/topping 

I sautéed some chopped onions in butter until they were clear, added the frozen clams and sake and covered. I left them covered for about 15 minutes and my clams were defrosted and steamed. I usually like to mix the clams with the sauce one more and let simmer for another few minutes. There should still be plenty of "sauce" in the bottom of the pan.


This is a picture of what was left in the pan after taking a couple of bowls of clams out. The clams taste good enough to eat just like this but I like the clams with a little spicy to balance out the sweet so I too with sliced scallions and togarashi. And the finished product:


I'm sure this method would taste great with any kind of seafood. 

Wednesday, March 2, 2011

Romesh’s Beef/Chicken Curry and Coconut Rice:

My friend Romesh is from Sri Lanka. He insists the only two things he learned how to cook his entire life is chicken/beef curry and coconut rice so he cooks this every time I come over. Good thing it tastes amazing!


Romesh’s beef/chicken curry:
Ingredients:
1 lb meat: bonless chicken breast chopped or beef chopped or bone-in chicken thighs
-salt to taste
-1/2 can coconut milk
-1/2 cup soy sauce
-oinions cut into slices
-2 tablesppons curry powder
-black pepper to taste
-1 tablespoon cayenne pepper
-oil to fry

In a pot with a lid heat oil and add chicken/beef...fry for several minutes, just long enough to brown slightly on the outside...then add all other ingredients except for the coconut milk. Cover with lid and simmer for 10 minutes. Add coconut milk, mix and simmer for another several minutes.

Romesh’s Rice:
Basmati rice - cooked
1-2 eggs scrambled
Green scallions chopped
Dash of coconut milk

Cook rice and set aside. Lightly scramble eggs in frying pan, add scallions and cook for one minute. Add rice and mix. Add coconut milk to taste.

Enjoy:)

Mom's Chicken and Artichoke Dish

So it's been a really long time since I have posted anything on this blog! I got to a point where I decided that I was on the computer all day at work and didnt want to get on the computer once I was home to update the blog. Also...I really need a better camera. I have still been cooking and taking pictures so maybe it is time to play catch up. Two things have inspired me to get back to blogging - one is that I really needed a recipe and and couldn't find it anywhere and then I realized it was on my blog - my blog is like my own personal recipe rolodex! The other thing is that the director of marketing found my blog online and has kind of given me a little push to continue. For my first entry back I thought I would post a favorite dish of my mothers - she makes this for company whenever she wants to make something tasty and easy to make. This is of her creation.

The following is the recipe in my mothers words:

Ingredients

4 chicken breasts, skinned and off the bone
1 large onion, chopped
2-3 Tablespoons olive oil
5 Tablespoons, flour
pinch salt
pepper to taste
2 cans diced tomatoes with garlic and basil
1/2 jar of marinated artichoke hearts, quartered

Directions

Saute onion in olive oil in large frying pan until golden. Meanwhile, clean and cut chicken breasts into 1-2 inch pieces. Mix salt, pepper and flour on a piece of aluminum foil and lightly coat chicken pieces. Place chicken on top of onions and lightly brown over low to medium heat on both sides. Add two cans of diced tomatoes and artichoke hearts and mix together.


Cover and simmer for about 25 minutes. Serve over rice or pasta or mashed potatoes. Serves six. May be cooked the day before and reheated. Refrigerate or freeze leftovers.


Enjoy with rice or pasta.

Tuesday, April 6, 2010

Healthified mac n cheese

I was trying to figure out what to eat for dinner one day when and I opened up the Home and Garden's that came that day and I came across a healthier version of mac and cheese. I am a big mac n cheese lover so if you can make a healthy mac n cheese taste good - you are my best friend! I thought I would try the recipe with a few adaptations:

Ingredients:
-Whole wheat pasta 1 and 1/2 cups - I used whole wheat shells
-1 and 1/2 broccoli florets and finely chopped carrots
-1/4 cup finely chopped onion
-4 tsp olive oil
-3/4 cup 75% reduced fat white cheddar cheese
-1/2 cup 75% reduced fat pepper jack cheese
-1/2 cup of parmesan cheese
-1 and 2/3 cups fat free milk
-1 tbsp all-purpose flour
-crushed red pepper and italian seasonings to taste
-some panko bread crumbs to sprinkle on top

Steps:

1. Heat oven to 425 degrees...while the oven is warming up cook pasta and add broccoli and carrots in the last 3 minutes of cooking...drain pasta and veggies and set aside.

2. While the pasta is cooking heat 2 tsp of olive oil in pan and cook onions until soft and translucent. Remove pan from heat and stir in parmesan cheese...stir until blended.

3. In a medium bowl whisk together milk and flour until smooth...add to onion mixture...cook and stir over medium heat until thickened and bubbly...reduce heat to low and add the rest of the cheese...stir until melted...add cooked pasta mixture and stir to coat.

4. Transfer pasta mixture to a cassarole dish...in a small bowl toss panko breadcrumbs with remaining oil and sprinkle on top of pasta...sprinkle with crushed red pepper and italian seasonings...bake for 15 minutes or until top of browned.

This mac and cheese is probably the best mac and cheese I have ever had...it had so much flavor and it was a much healthier option...until I ate almost all of it...and saw it was supposed to feed six...whoops!
If you want to see the original recipe it was in the March 2010 Better Homes and Gardens.
Some pictures of the finished product:

Asain Inspired Turkey Burgers

I was trying to work out and eat healthier for a while so this meant trying to be creative with some healthier ingredients - during this time I made an amazing Asain inspired burger that I think should be featured on a menu somewhere that's how good this burger was;)

Ingredients:

- 1 pound ground turkey
-chopped cilantro to taste
-chopped broccoli slaw
-grated fresh ginger
-grated ginger
-a few dashes of hot sauce
-2 teaspoons of soy sauce
-red pepper flakes to taste


Mix all indredients together and shape into burgers. Place on a baking sheet and bake at 400 degrees for about 25 minutes or until burgers brown slightly.


The mixture


patties

The finished product - baked burger with ketsup, more broccoli slaw on a whole wheat bun.

Tuesday, February 9, 2010

Brown Sugar Salmon & Pero's new Salad Cut Ups

The company/farm I work for recently came out with a new line - salad cut ups. They have all the mix-ins for salad - you just need to add the lettuce and salad dressing...and if you are like me and hate lettuce, these are perfect for you!


The first salad cut up I tried: Garden - I had chunks of cucumbers, whole grape tomatoes, julienned carrots, diced green peppers and chopped red onions. The first thing I noticed that I really liked was that all of the veggies are individually packaged - I think this is a great idea so everyone can take/use what they want. You also dont need to use the full amount all at once. The second thing I noticed was how fresh and crispy all of the vegetables were. They really all had great taste. I didn't even need to add any salad dressing because they were so flavorful. For me the best thing about this is that I know these veggies are super clean as they go through a series of vitamin baths at our facility and the area they are cut and packaged in is kept free of contaminates. I love this because I know I can just open the package and toss the veggies together - I dont have to worry about cleaning the product.

Like I said, these tasted so good I didn't need to add a salad dressing but I needed a main course. I wanted something a bit lighter with my salad so I decided on salmon.

Brown Sugar Salmon:

Ingredients:
-Salmon fillets
-1/4 cup of brown sugar
-panko bread crumbs to cover
-1/2 cup orange juice


Directions:
-place salmon fillets in a deep pan and make puncture holes several times with a fork
-pour orange juice over salmon filets
-sprinkle with brown sugar and rub into fish
-top with panko bread crumbs

Place in a preheated oven at 400 degrees and bake until salmon flakes with a fork.


Monday, February 8, 2010

Healthified BBQ Chicken Pizza

No matter how healthy I want to eat there is one thing I could never give up - pizza. So I just need to make it a bit healthier. This BBQ chicken pizza tasted so good and was pretty healthy too.Ingredients:
- honey BBQ sauce (I added too much)
-cubed 50% fat free cedar cheese
-lots of fresh basil
-minced chicken
-organic whole wheat naan bread

I just topped the naan with all of the ingredients and put into a oven preheated at 400. When the cheese melted I put it under the broiler for about 3 minutes...so good...just need less BBQ sauce next time!

Turkey Meatballs

I decided to make a healthier version of turkey meatballs and they came out really well. I took a pound of ground turkey, mixed it with shredded fresh basil, red pepper flakes, dried parsley and grated ginger. I made little balls and put them in a heated pot and added publix tomato sauce with no preservatives and no salt added. It was just a small can so it wasn't enough to cover the meatballs, I added enough water to cover the meatballs and heated on medium heat.


The mixture....


Raw...going into the pot.....


The finished product. What was so amazing was how much much flavor these meatballs packed - and healthy too!

Monday, February 1, 2010

Baked Halibut, spinach and paneer, and stuffed poblano peppers

So anyone who knows me knows I am not in shape at all. Most of my exercise of late has been walking my dogs...so I'm pretty excited to say that I started P90X - an extreme fitness system. Today is my 3rd day. I'm pretty excited about the workouts- I'm also pretty sore right now! I'm not loving the plyometrics at all and I'm really hating the ab ripper...so much pain! But I also need to diet a bit...eat a little heathier. Typically my favorite foods are anything fried or in a cream sauce. I am going by some of the food recommended in the diet plan but also innovating a bit. I really loved the meal I cooked tonight - I think I could eat it everyday! I had a poblano pepper sitting around and also some black beans that needed to be used up so I made a stuffed poblano pepper. The other thing to know about the diet is that it is high protien so the black beans work. I also bought a ton of spinach so that was an easy side...paneer is an Indian cheese that is basicallya block of cottage cheese. Its pretty yummy and stays pretty solid so it can even be subsituted for meat in lots of dishes. I tried eating regular cottage cheese this morning and I couldn't do it - nothing should be runny and chunky at the same time! So I thought paneer would be a great way to get some cottage cheese in me! The last in 6 0unces of Halibut that the program also recommends for dinner.


Halibut:
6 0unce of Halibut filet
lemon juice - sprinkle
garlic salt - sprinkle
dried basil - spinkle
All I did for the Halibut was take it out of the freezer and sprinkle with lemon juice, a little garlic salt and a decent amount of dried basil. I then put it in the oven and baked it at 450 degrees for about 10 minutes. I never had halibut before today, so I added a little sauce. I was expecting it to be fishy. Wow was I wrong, no sauce needed, just amazing taste and all it really needed was the ingredients above. I think if I could eat halibut every day for dinner I would be happy!
Stuffed Poblano Pepper:
one poblano pepper top cut off and de-seeded
a quarter of an ounce of 75% reduced fat cheddar cheese
black beans and a dash of garlic
I just stuffed the cheese and beans in the pepper and put in the oven with the fish at 450 - these were ready to come out when the skin on the pepper started to shrivel - they were ready a few minutes before the fish.
Spinach and Paneer:
a couple of handfuls of fresh spinach
a couple of dashes of dry white wine
a clove of garlic
a quarter of a block of paneer cut into cubes
So I would typically fry the paneer in oil to cook it - this is where the wine came in. I heated a frying pan on medium high heat and and added a dash of white wine and the minced clove of garlic. I let the wine boil down and added the paneer and heated until browned. When the paneer started to brown I lowered the heat and added the fresh spinach. I then added another splash of wine and cooked the wine down. The paneer was much sweeter than usual due to the wine.
This meal is going to be a repeat for sure over the next 90 days of this diet!

Wednesday, December 2, 2009

Boursin and Cherry Stuffed Chicken Breast


So I moved this past weekend and before I moved I had some things in my fridge/pantry that I wanted to use up. I decided to combine a few things and make a stuffed chicken breast.


I had some herbed spreadable cheese - Boursin, boneless chicken breast, some dried cherries and some mamasita fiesta sauce.


I cut the chicken breast in half to make two cutlets and spread some cheese on each cutlet and dotted with the dried cherries. I rolled up the chicken and secured with toothpicks, placed them in a casserole dish and heated them in the oven at 400 degrees until the chicken was golden brown and the cheese was bubbly.


I served with a side of stuffing and green bean casserole. I ate the first piece of chicken with nothing on it and it tasted really good. I decided that I would try heating up a little mamasita's fiesta sauce and water in a saucepan and pouring it over the second piece. It was so good I decided to make the same exact meal for my mom a few days later.


This is a meal that was so easy to make and the combination of herbs and sweet cherries tasted so good I would make it again and again!


Eggplant and Ziti Casserole

At work we get all types of free samples of produce for various reasons. Last month I got a few eggplants and had to think of some creative ways to use them. I also had some non-fat ricotta cheese that I needed to use up. I decided to try to make a casserole. I had seen something similar on a recipe website a few months before. I love casseroles! Not alot of work or clean up, plenty of leftovers and the food is so hearty!


I cut the eggplant up into long slices about 1/4 inch wide and fryed until brown on both sides. I lined the bottom of a casserole dish with the eggplant and set aside.


I used Ronzoni smart taste penne rigati- its suppose to have vitamins and be healthier for you. I used 3/4 of the box of penne - boiled some water and cooked the pasta until tender.


While the pasta was cooking I mixed the carton of non-fat ricotta cheese with a little parmesan cheese, cracked black pepper, italian seasoning, a little crushed red pepper and garlic salt.


When the penne was done cooking I drained and mixed with the ricotta cheese mixture. Layered half of the penne/cheese mixture over the eggplant and then add a layer of red sauce and the rest of the penne/cheese over that. Bake at 400 degrees until the cheese and noodles on top turn golden brown.

What I got looked like this:


It was sooo good and pretty healthy too!

Tuesday, December 1, 2009

Baby Butternut Squash Risotto

We got some baby butternut squash in at work last month and I couldn't figure out what to do with it - then it came to me - risotto! I have cooked butternut squash or risotto myself before so it was alot of fun.


The first thing I got to was cooking the butternut squash - I decided to split them in half and scoop out the huge amount of seeds inside. Then I filled each half with butter and sprinkled with sea salt and cracked black pepper. I put them in the oven at 400 degrees until all the butter was melted.


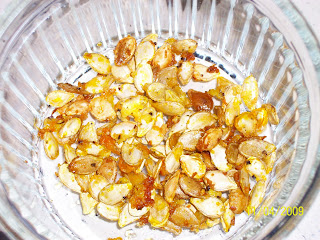
The most fun for me was all the seeds which I wasn't really expecting! I baked them with the butternut squash. I sprinkled them with garlic salt, cracked black pepper, olive oil and parmesan cheese...mmm!

Before it went in the oven it looked something like this:

And after it came out of the oven:


While the butternut was cooking I got started on the risotto. Being the first time I cooked risotto I went with a basic recipe.

You need the following ingredients:

1 cup white arborio rice

1 tablespoon Olive oil

1 large yellow onion diced

1/4 cup grated Parmesan cheese

5 cups hot chicken stock

1/2 cup white wine

Start with heating oil in a pan on medium and sauté the diced onions until translucent. Add dry arborio rice and stir...continue stirring until a white dot shows in the middle of the rice. Add white wine and stir until absorbed. Then add 1/2 of the stock and stir constantly until the stock is absorbed. Once stock is absorbed add more stock 1 ladel at a time and stir until absorbed, continue doing this until all stock is gone. This should take about 20 minutes and the rice should have a creamy consistancy when you are done. When the last of the stock is absorbed remove from heat and stir in parmesan cheese. Season with salt and pepper.

I couldn't believe that this:


Ended up looking like this:


I made a huge mess and it is very time consuming but it was so good!


By the time the risotto was finished the butternut squash hadn't really had a chance to cool down yet so I scooped it out with an ice cream scoop and mixed it into the risotto.


The end product looked something like this:


But really my favorite out of all of it was really the pumpkin seeds, finally made it feel like fall was here:


Tuesday, October 13, 2009

Asian Feast

I took a little break for a while from blogging...my camera broke so I couldn't get all of my tasty creations up...I started cooking again a few weeks ago and I have been slow to get pictures up. I will be posting a lot in the next few day to catch up!


It's been a while since I have cooked some Asian food so I thought I would really cook it up last night: I made a version of Filipino lumpia that they serve in a restaurant close to my house, some Japanese chicken katsu with tonkatsu sauce over white rice with some yaki udon on the side.


It's all pretty easy to make and if you cook alot or cook any asian food you will probably have a lot of the ingredients lying around.

Lumpia:
*depending on how many you want to make you need to increase the amount of ingredients - I just wanted to test it so I only made two Lumpia (wish I made more)


Ingredients:

spring roll wrappers (2)
ground beef (1 cup)
1 carrot chopped into small pieces
green peas (1/4 cup)
1 teaspoon garlic salt
1/2 teaspoon cornstarch
1 teaspoon soy sauce
a couple of dashes of hot sauce
(I also threw in a dash of powdered ginger)
*thai sweet chili sauce for dipping

Directions:
1. Brown beef in skillet or wok...while you are browning beef boil water and add carrots and green peas. Continue to boil until they are soft. When vegetables and beef are cooked through add to bowl and mix with the rest of the ingredients


2. Take one spring roll wrapper with point facing you and begin to fill by spooning mixture 2 inches from point of wrapper facing you. Begin to wrap, folding corners into the inside of the spring roll as you wrap. close spring roll by pressing firmly or sealing with water


3. Heat oil in a non-stick wok and add spring rolls one at a time - they cook fast so watch them!


4. Take spring rolls out of wok when brown and crispy and drain on a paper towel. Enjoy with thai sweet chili on the side.


Yaki Udon:
I just made veggie yaki soba but you can really add anything to yaki udon: meat, chicken, scallops, pork...


Ingredients:
dry udon noodles
2 cloves of garlic (chopped)
1 inch of ginger (shreeded)
shreeded cabbage to your liking
shreeded carrot to your liking
1 packet of yaki udon/soba sauce


Directions:
1. boil water and add udon noodles (do not add salt to water as udon is very salty already)

2. while udon noodles are cooking add garlic and ginger to a heated and oiled wok - note that they will brown fast so be ready with veggies to throw into the wok

3. add any desired vegetables - like carrots and cabbage

4. drain noodles and add to wok

5. after noodles have cooked for a few mintues add powdered yaki udon sauce

6. you may need to add a little water to the wok at this point to evenly distribute sauce and make it more...well....saucey..mix well and cook for another minute or two and then you are ready to enjoy


Chicken Katsu:


Ingredients:
chicken cutlet
white flour
salt
oil
egg
panko (japanese bread crumbs)


Directions:
set out four plates:
On plate one: mix flour with salt to taste
on plate 2: one beaten egg
on plate 3: panko
plate 4 leave empty for breaded cutlets


Dredge cutlets in flour, coat with egg and then cover with panko. Press panko into cutlets and then place on empty plate and repeat.


Heat oil in a non-stick frying pan and fry cutlets until golden brown on both sides.


Slice and serve over white rice. Traditionally Chicken Katsu Don is the cutlet sliced served over fried egg and white rice. Drizzle tonkatsu sauce over chicken.

Enjoy!!

Friday, July 31, 2009

Pero Sweet Pepper Thai Chicken with Peanut Sauce

I work in sales at a produce company. My company's name is Pero Vegetable Company. We grow peppers, squash, cucumbers and all sorts of other produce and we sell anything from blueberries to rain chard. If you live anywhere on the east coast of the United States, the mid-west or even in Canada chances are you have eaten at least one of our peppers before. We are most widely known for our 3 count peppers trays:


We write recipes using our products and we send these to customers and put them out in trade publications. Unfortunately, the end consumer doesn't usually get ahold of these recipes. The following recipe is using Pero mini sweet peppers. If you havent cooked with mini sweets before you must really try them-they are packed with flavor! I have sliced them on home made pizza's and stuffed them with rice, beans and cheese as appetizers.


Pero Sweet Pepper Thai Chicken with Peanut Sauce

Ingredients:
1 lb of chicken tenderloins
3 oz. of seasoned corn starch
(add a pinch of salt, pepper and garlic starch)
3 oz. of vegetable oil

1package of Pero's Mini Sweet Peppers (sliced into strips)

6 scallions (white tops only)

1/8 cup of carrot sticks

1 clove of minced garlic

1 tsp of grated ginger

5 tbsp of roasted crushed peanuts (garnish)


Sauce:

Combine all of the ingredients together in a bowl

1 tbsp of creamy peanut butter

2 tbsp of coconut milk

2 tsp of brown sugar

1 tsp of 5 spice powder

1/2 tsp of rice wine vinegar

pinch of garlic powder and salt

Procedure:
Heat oil in a large saute pan (medium high heat). Dredge tenderloins in the seasoned corn starch and saute until golden brown. In the same pan add mini sweet peppers, carrots, garlic, ginger and scallions and saute lightly. Incorporate the peanut sauce and serve immediately.